Like any industry or job, it has its system of quality control. The specs (technical specifications) usually change with every project. Spruce is better for wetter ground, while pine can be better in higher, drier ground. If planting on the coast, you might be instructed to plant certain trees in certain ground, carrying with you different species, even fertiliser packets.
The average distance between trees also changes, as does the minimum spacing. This can be the hardest part for a new planter, even experienced ones.
For example, the contract might specify 8 trees per “plot”, with 1.5m minimum spacing. A plot is measured by sticking one’s shovel in a random spot, looping a “plot cord” through it (8 feet long) and walking in a circle around the shovel to mark all the trees that were planted within that 8 foot radius.

You might be told that to achieve 8 trees per plot, the average spacing should work out to 2.3m between trees. But because of slash, big stumps and other obstacles, this ideal spacing is often not possible, for which reason you are allowed to squeeze your trees a bit closer together, hence the minimum spacing requirement. Here is an example:
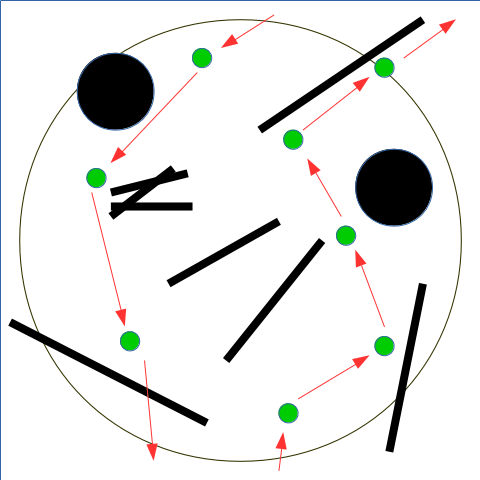
The black circles could be stumps and the black lines logs left on the piece. The green dots the trees you plant, and the red arrows your path.
Usually you are dropped off on a big “block” (a big chunk of land from which all the trees have been cut down and removed), and asked to “cut yourself a piece”. The foreman might put you in a certain spot a certain distance away from the previous piece (or tree line) and ask you to plant a row of trees to the top of your new piece, always leaving long ribbons high up to mark the border of your piece. Once you get to the top of your piece, you would fill in the back until you start running out of trees, and then plant your way back to the cache. Something like this:

The brown squiggly horizontal line would be the logging road, the green treeline to the left. The purple dash is the ribbon you leave behind so the next person cutting their piece off of your could easily see it. Let’s say in this case you are planting uphill. So you plant your way to the top of your piece, tying up some ribbons along the way. Once you get to the top, you would plant your way along the contour, horizontally, back and forth. Once you start running out of trees in your bag, you would plant your way back down to the “cache” (the storage of trees, black box in the picture above, which the foreman would occasionally restock as you deplete it. Note that it is placed where the next person could also easily access it).
So in the plot circle above, you could consider it one line going up, and the other planting down back to the cash in the opposite direction.
The trick is to try to use your minimum spacing as much as possible, so that you walk a minimum distance between trees, while “spacing off” your previous line on your way back down, such that the end result is you have 8 trees in your plot. Note the one tree that is right on the edge of the plot circle – this one will be included by the checker/forester.

Obviously this sort of spacial judgement is not easy and will take some time to get used to. Newbies might be found dragging their plot cord behind them to help them judge the exact distance to their previous tree. And if you are inexperienced in this, in the beginning it would be a good idea to occasionally stop to count how many trees fall in a random plot circle.
As you will see in the plot circle example above, ideally you want a nice, easy path to your next tree, not clambering over logs or stumps in an exact straight line, but to fill your piece, always choosing the easiest (creamiest) spots to reduce effort and distance traveled between trees.
Quality control
Generally the foreman will be on top of that, walking around with his/her own plot cord, testing in various locations of your piece. All trees that fall within the plot circle will be carefully dug up to make sure each has correctly complied with the specifications. Which might be:
- the plug/root has to be vertical and straight
- the plug or root cannot be damaged or broken by the shovel
- the plug or root must be fully underground, with no parts exposed to the air (the tree will dry out and die), while none of the bottom leaders (the little baby branches growing on the seedling) can be buried beneath the top soil
- there cannot be any air pockets around the root in the soil which could lead to the tree drying out and dying
On each project you will be briefly told what the specifications are, but from the above you can only imagine that it is not an easy task.

Generally you are entitled to a grace amount of error, such as 7%, meaning that if 93% of your trees pass the test, you pass. If you plant too many or too few trees in a random plot circle, or some are too close together, and you fall below the 93% pass mark, you will fail and you may be asked to go back to your piece to fix it. This is called the dreaded “replant” and inevitably results in downtime and lost income.
After the foreman, the forester will be checking as well, often while the contract is underway, and a final one afterwards. If the overall contract falls below the pass threshold, there will be fines, often distributed among all the planters.
A big problem in this scenario, as explained on the forester page, is that the forester might not have any experience planting and is just following his textbook instructions of how the tree should look. You may find your entire crew replanting for a day or two when it is not necessary at all.
Some more detail on the plot page.

Next: |
We are a family operation managing private custom boat tours in the beautiful Palawan area, and are happy to help travelers with their plans through the country, having traveled a lot of it ourselves and planning to visit it all. The pages in this section concern when I was treeplanting in Canada over eight summers.