Like termites in an attic, we gobble up empty space and fill out empty blocks stripped of their trees. The Native American First Nations Peoples, as they collectively take on contracts too, like to start in the middle of an area and plant outwards like dew drops spiraling out of a snail shell. However, in our own, conditioned manner, we create square blocks starting from left to right. Empty blocks are usually divided by roads or paths, from where harvested trees were carted off and a suitable location where to place tree caches. You would leave your lunch and belongings at the cache and load up trees there. Typically, a foreman would tell you where you will be “cutting your piece”, pointing some direction from the road or path.
 To cut your piece, it is polite to make it nice and visible for the next planter, who will be cutting the piece next to you and planting off your ribboned trees. Some of your placed ribbons should be long, so as to be seen from a distance. If the next planter cutting a line can see your line while cutting his, it would avoid such occasional nuisances as getting a very wide piece in the back and eventually having to walk over a planted section to get back to the open area.
Hence the first row of ribbons defining your piece should also be high. I like to leave a ribbon every three planted trees, depending on how visible the trees are to the other planter (height and size of seedling, surrounding bushes and high grass). You can plant a strip of trees two to three trees wide if planting through a lot of slash, but keep in mind that you do not want to fill it along the side too quickly. Depending on the shape and conditions of your piece, it is sometimes better to bagout (emptying your bags of trees) at the back of your piece, where you are filling in your piece parallel to the “front” (that part closest to your cache) of your piece. Otherwise, it is advisable to bagout close to the cache. If possible, just plant a straight and single line when planting to or from the back of your piece. If planting more than one line in a row, you can drop or tie up a flag/ribbon whenever on the outside line, standing on it and looking down its length to keep it straight and easier for your neighbour planter to follow. When starting your outside line, earmark a target in the distance to help keep it straight.
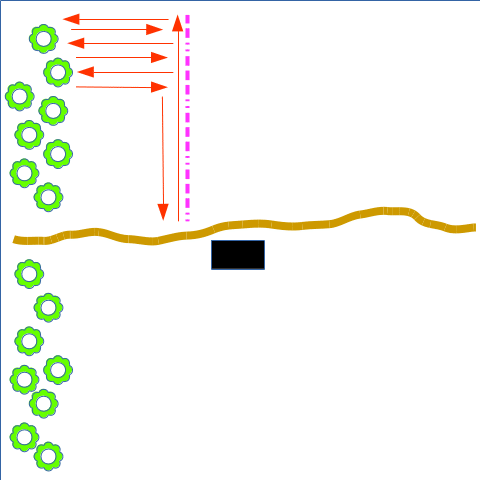 Picture explained on the specs page showing a rough pattern of planting to the back of your piece, filling it in horizontally, then planting back to the cache once running low on trees. The green is the treeline to the left – edge of the block.
Once you have cut your piece (visibly ribboned your outside line for the next planter), you can pretty well fill it in as you wish. I like to cut along contour/horizontal lines if in a hilly area. If there is a massive long slash cutting into your piece, just fill in one side first. Try to cross as little slash as possible, and utilise your minimum spacing. I’ll often stare at my piece for a second and develop an overall strategy before embarking. Sometimes it is better to line plant (plant in straight lines) while other times it is better to area plant (plant smaller areas defined/bordered by heavy slash). Some slashy corners of my piece might be better area planted, while the rest line planted. You can create a rough map in your head, or just respond to the conditions once you get there. If I choose to area plant a certain section, it is better to plant according to some easily visible landmark, such as the horizontal contour of the hill, a treeline, or a road. If your trees are big and easily visible, you can simply space directly off them, glancing at your previous “line” from time to time as you race forward. Other times it may get a bit slashy and it is better to plant more haphazourdly, creating a thicker single line (about 1.5 lines wide), always aiming for the easy and creamy spots instead of rigidly sticking to a straight line. If you find you have wandered farther away from your previous line, squeeze back in to compensate for a while. You are not expected to produce perfect plots every time, but you want to aim for that, to avoid having to replant.
Usually I do not plan so much but react on individual micro areas. If you do decide to line plant a certain area, I find a nice straight line can get you into a fast rhythm, pounding in one tree after another without looking for your next spot. If the ground is real easy and you can pick up a greater pace by keeping your line as straight as possible, I’ll take greater pains to make that happen.
Highballing in very easy ground, in trenches where it is generally easier to plant in straight lines along the trenches, although this planter (who put in 6,000 trees within 7.5 hours that day) is combining area with line planting.
Regardless of which areas you line plant or area plant, it is generally better to fill from the back of your piece towards the front, ideally always bagging out< at the cache so you don’t waste any time walking bag empty. If your piece is long and narrow, it may be better to just walk to the back and fill your way to the front, so that you do not cut yourself off in a very narrow sliver. When I area plant, I tend to bounce off things while maintaining a general direction. The slashier the ground, the wider I plant (as in three trees wide, for example, planting three rows at a time to give me room to maneuver around the slash). In slashier ground, your “line” doesn’t have to be exactly three trees wide all the time, for example, but is best varied depending on the shape of the slash in each micro area. Think of it as a PacMan running through a maze gobbling plantable spots. You bounce off the maze walls but always turn back when there is a choice to turn left or right.
If I find myself in a clearly defined area surrounded by unpleasant obstacles, I’ll make sure to fill in that area first, filling it in so that my last tree is at the point I want to exit the area from (most probably the easiest part of the boundary to cross over). Once you get out of that slashy area you can go left or right, but always plant along the slash you just left from.
 This way you will not leave any holes. Sometimes there may be some plantable spots in a very difficult place to get to. It is up to you to decide whether you should go to the trouble or just use “oops, I guess I missed it” as an excuse. When in a larger and contained area, area plant micro areas within it, planting the micro areas as patches and filling in the larger area one patch at a time. Always choosing the next plantable spot to avoid as many obstacles as possible. Many planters drop ribbons next to a lot of their trees to see them better, you can drop occasional ribbons to mark entire micro areas, or just recognise the slash from before. It is often best to “triangulate” off your trees, creating a triangle with your last planted tree, the tree you are presently planting, and the tree or slash you are planting “off” of. Usually you plant as close to large chunks of slash as possible, trees spaced the minimum, assuming a larger distance to the other side of the slash. If the slash consumes half of a plot area, the checker will see that you had no other option than to squeeze them in where you could. This obviously works to your advantage, since you travel shorter distances between trees. Slash in this sense would include anything we cannot plant in – such as ponds, marsh, tree lines and so forth. Planting along such areas can be fun and helps to define your piece for you.
Painting your land in this common sense way can also help reduce the need to flag your trees, for orientation. And why fumble around with flagging tape when you can plant your trees in visible areas and in such a way that you easily see them on your next pass? If you do like to ribbon a lot, one trick is to cut slices in the sides of your roll before you start your day, so that the ribbon easily rips off in small sized strips. Whatever your choice, the aim is to be efficient and avoid standing and gawking for where your trees are.
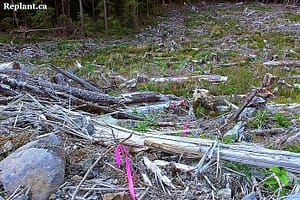
Scenes on the coast, highballer, lots of slash to plant around, area planting definitely advisable on turf like this.
And whether you line or area plant, always keep an eye out for the “best plantable spot”. Or creamy spot. Go for the creamy spots first and then fill in the occasional tree into the harder stuff (roots, tougher soil, obstacles), in order to get the correct number of trees into each plot. A creamy plantable spot is one which is relatively much easier to plant in compared to the surrounding average. Therefore, whenever you see some of these ‘faster spots’, bang in your trees at minimum spacing, and then space off those trees in the harder stuff at wider spacing, to even out the plot average where it should be. Over time, you will learn how to read the ground for faster and creamy spots as you prod and struggle with various ground with your shovel.

Next: |
We are a family operation managing private custom boat tours in the beautiful Palawan area, and are happy to help travelers with their plans through the country, having traveled a lot of it ourselves and planning to visit it all. The pages in this section concern when I was treeplanting in Canada over eight summers.